STEP ONE

You should clean the stone thoroughly and let it dry before applying a sealant coat of shellac.
The very earliest findings dating almost from the dawn of the history of mankind show that, because of its beauty and rarity, gold has always exercised an enormous fascination on the human race. The latest scientific investigations suggest that gold was first found in its pure metallic form and processed as early as 6000 BC. Gold is malleable enough to be worked easily, even when cold. Although the history of gold was for centuries closely bound up with the history of wars, the yellow metal itself was too soft to be made into serviceable weapons. The special properties of gold lead it to be regarded as a symbol for the gods. It was used mainly on ornaments for priests and rulers, for sacred objects and offerings, and as tributes. Its malleability meant that even from very early days gold could be worked not only as a solid mass, it was also used as a cladding, a thin coating over other materials such as wood, stone, ceramics or other less valuable materials. Mechanical gilding using gold leaf first flourished in Ancient Egypt. We know that gilding with gold leaf was carried out around 3000 BC to 2000 BC using procedures little different from those being used today.
Leaf metals are metals beaten out to paper thin foils. They are produced in an elaborate procedure and by entirely mechanical means from metals and alloys. The metals are first rolled out thinly and then beaten out further in a series of stages. Leaf metals include gold leaf, silver leaf, aluminium foil and composition leaf made of copper and zinc alloys. Because gold is so soft and malleable it can be beaten out much thinner. Composition leaf, being thicker, is easier for beginners to work with. There are a number of ways in which the experts differentiate between the two. Composition leaf is not transparent, gold leaf is faintly transparent when held against the light. Another distinguishing feature is that composition leaf oxidizes. This can be prevented by giving your finished projects a protective coating of varnish a few days after completion.
Follow the easy steps below and turn your self into a modern day "King Midas".
Using the example of an ordinary "boring" old stone, which you can quickly transform into a gleaming gold nugget, we show you the main steps necessary to create "gold" surfaces using composition leaf. You'll soon realize that working with these thinner than paper sheets of "gold" is not as difficult as you may have thought.
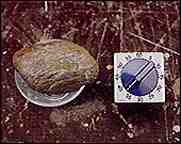
STEP ONE |
|
|
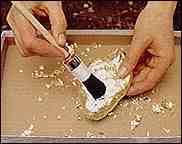
It
is important that the surface to be treated is clean, free of dust and grease, and is as
non-absorbent as possible. You should clean the stone thoroughly and let it dry before applying a sealant coat of shellac. |
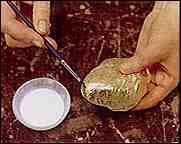
STEP TWO |
|
| Let the size dry, this will take about 15 to 20 minutes. |
|
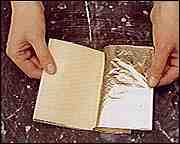
STEP THREE |
|
|
Remove one sheet of Composition Leaf from the booklet. |
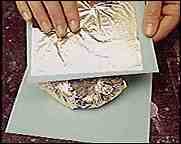
STEP FOUR |
|
| Place your stone directly onto the leaf. Depending on the temperature of the room and humidity, you have up to 30 hours in which to apply the leaf. Although the size dries quickly it remains tacky and will accept the leaf for a long time. |
 |
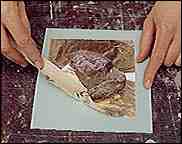
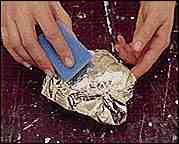
STEP FIVE |
|
|
Now press the leaf onto the stone using a spatula. |
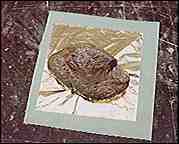
STEP SIX |
|
| It will now look like this. Don't panic, it will look better soon, trust me. |
 |
STEP SEVEN |
|
 |
Cover the remaining areas with more pieces of leaf. You'll find it easier to apply large pieces of leaf if you slip the individual sheets directly from the booklet onto a piece of cardboard. |
STEP EIGHT |
|
| Once your stone is completely covered with leaf, pat the leaf down with a soft sponge. |
 |
STEP NINE |
|
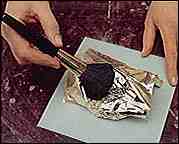 |
Use a soft blusher or powder brush to further pat down the leaf . A brush is used for reaching into the crevices which the sponge has missed. |
STEP TEN |
|
| Before going any further, make sure that the entire surface is covered completely and evenly with leaf. Smaller pieces of metal should be laid on any bare areas and carefully pressed down using the powder brush. |
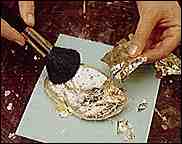 |
STEP ELEVEN |
|
 |
All of the gold leaf should now be pressed or rubbed down with a circular motion using a stiffer round brush. |
STEP TWELVE |
|
| Now your "nugget" has a beautiful golden gleam. If there are any areas or little blemishes where the leaf has not stuck they can be dabbed with a small amount of size, when it has dried a small piece of leaf can be placed on it and pressed down. |
 |
STEP THIRTEEN |
|
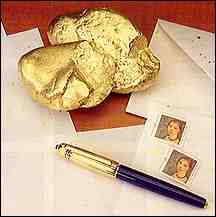 |
Now all you need to do is let your "nuggets" dry for a few days before applying a protective coating of shellac. They make excellent paper weights for the high powered executive or place them inside a small black bag and give them as "treasure" to a friend. |
We have the following Gilding supplies available.
Leaf - Composition#
9941001
Composition Leaf - Gold - 85% Copper, 15% Zinc. 5.5" square,
25 sheets/ book
#
9941002
Composition Leaf - Aluminium Silver - 5.5" square, 25
sheets/ book
#
9941003 Composition Leaf -
Copper - 5.5" square, 25 sheets/ book
# 9942001 Quick Size Brush On Leaf Size - 4oz. NB this is a liquid so only available for sale within New Zealand
# 9943002 Quick Seal Brush On Clear Seal - 4oz. NB this is a liquid so only available for sale within New Zealand
# 9944001 Leaftek - Dry Size - approx. A4 sized sheet. Write on the item to be gilded and then apply the leaf. Perfect when gilding books. Contact us for availability
Leaf - Metal Glue
# 1026153 Foil Adhesive - 2oz - Contact us for availability